 Loading... Please wait...
Our Newsletter
- Home
- Activation Guide
- Activation Tool Directions
Activation Tool Directions
Cryoguard Activation Tool Directions
The activation tool is designed to facilitate activation of Cryoguard™ Thermal Exposure Indicators. It is required for the activation of M-135 and M-150 indicators and is helpful when activating other indicators. Using the tool for activating indicators minimizes thermal exposure during the activation process and enables activation of an indicator both on and off a freezer cane.
Activating an indicator off a freezer cane:
-
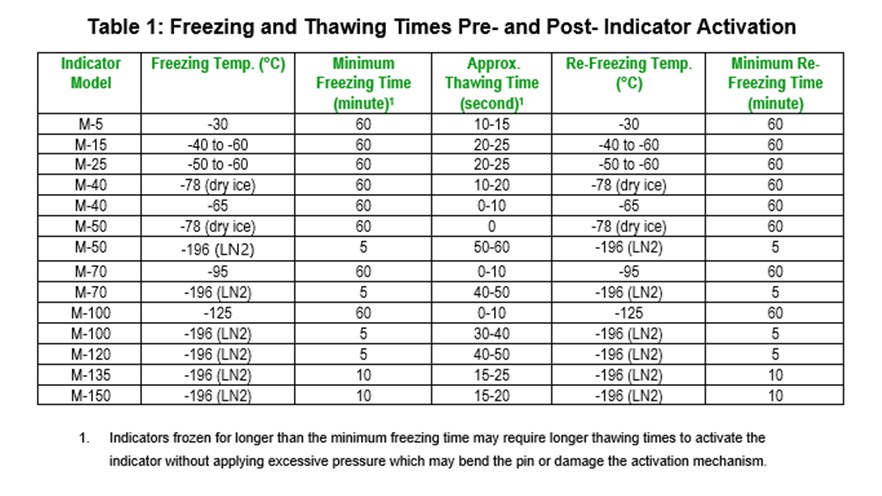
Freeze the indicator for the appropriate length of time and at an appropriate temperature based on the indicator model. See Table 1 below to determine the correct freezing conditions.
-
Place the frozen indicator in the activation tool with the pin pointing in the direction of the tool hinge with the eyelets of the indicator behind the small posts adjacent to the back wall as depicted in Figure 1.
-
Allow the indicator to thaw for the time stipulated in Table 1.
-
Apply gentle, steady pressure to the lever of the activation tool until the pin begins to depress. Once the pin moves, slowly apply more pressure until the pin is completely pushed into the indicator with no gaps between the plates on the activation tool and each end of the indicator.
-
Immediately replace the indicator in the environment used to freeze it and refreeze the indicator for the refreezing times stipulated in Table 1.
- Place the indicator in the environment to be monitored.

Activating an indicator on a freezer cane:

-
Place a Cryoguard Thermal Exposure Indicator in the bottom slot of the freezer cane with the pin pointing down (Figure 2).
-
Check the fit of the freezer cane and indicator in the tool using the directions in step 5 for positioning the freezer cane on the activation tool.
-
Freeze the indicator on the freezer cane for the appropriate length of time and at an appropriate temperature based on the indicator model. See Table 1 below to determine the correct freezing conditions.
-
Remove the freezer cane from the coolant with the activation tool in hand, ready for use.
-
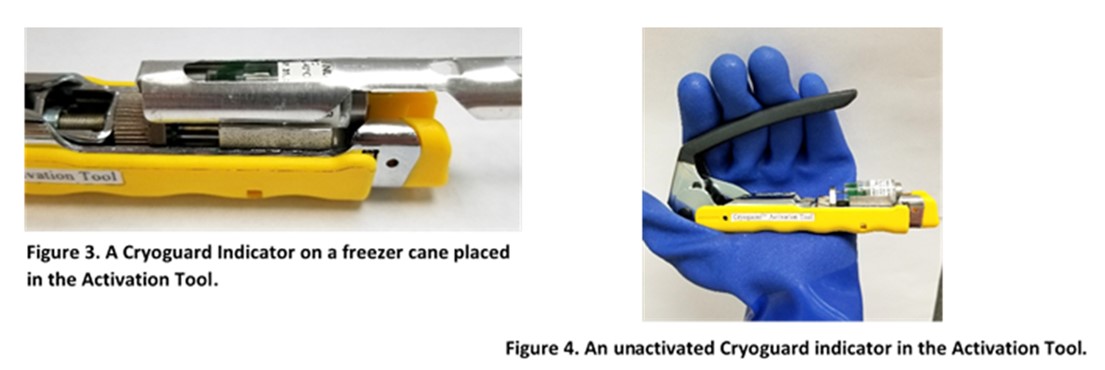
Position the freezer cane on the activation tool so that the indicator is in the tool between the two plates and the unused length of the freezer cane is pointed away from the hinge of the tool as depicted in Figure 3. Position the indicator with the eyelets of the indicator behind the small posts adjacent to the back wall as depicted in Figure 1.
-
Allow the indicator to thaw for the time stipulated in Table 1.

-
Apply gentle, steady pressure to the lever of the activation tool until the pin begins to move into the indicator housing. Once the pin moves, slowly apply more pressure until the pin is completely pushed into the indicator housing.
- Immediately refreeze the indicator (without removing it from the freezer cane) for an appropriate amount of time based on the indicator model. See Table 1 below to determine the amount of re-freezing time needed after activation. It is especially important to refreeze the M-135 and M-150 indicators quickly to prevent a premature color change.
-
After refreezing, the indicator is ready for use. For example, additional samples may be placed on the freezer cane containing the indicator or the indicator can be moved (using tweezers) to a freezer cane containing specimens to be monitored or the indicator can be removed from the freezer and placed in the environment to be monitored.
**Handle frozen indicators with insulated gloves to prevent premature color change. Always wear safety glasses.

